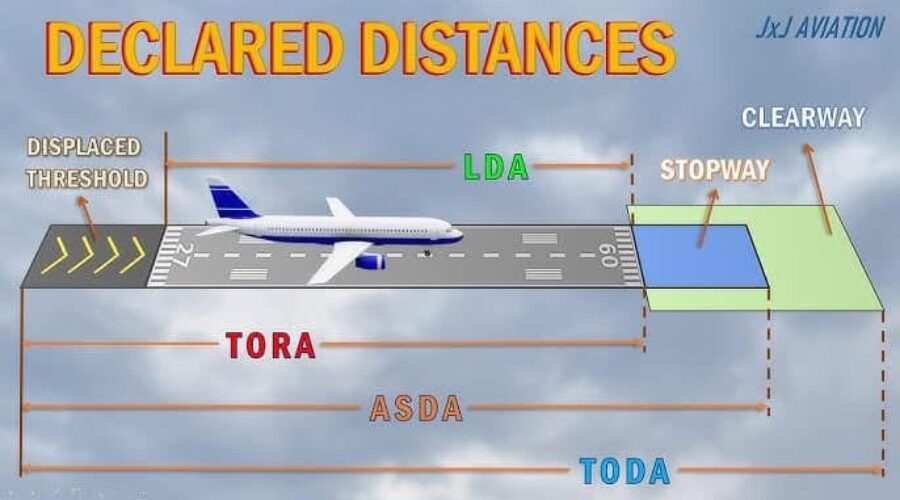
DECLARED DISTANCE
The image is explaining “Declared Distances” on a runway. It features a runway with an aircraft on it, and different runway distance parameters labeled. The key terms and their representations in the image are:
- TORA (Takeoff Run Available)– Shown in red, this is the length of runway declared available for the ground run of an aircraft during takeoff.
- TODA (Takeoff Distance Available)– Shown in blue, this includes the TORA plus any Clearway, which is an area beyond the runway that an aircraft can use to continue its takeoff.
- ASDA (Accelerate-Stop Distance Available)– Shown in orange, this is the total distance available for an aircraft to accelerate and, if necessary, abort the takeoff and come to a stop. It includes the Stopway, an area beyond the runway designated for stopping if takeoff is rejected.
- LDA (Landing Distance Available)– Shown in green, this is the length of runway available for landing, beginning from the Displaced Threshold.
- Displaced Threshold– Indicated at the beginning of the runway, this is an area where landing is not permitted but can be used for takeoff or taxiing.
- Stopway– An area beyond the TORA used for emergency stopping.
- Clearway– An area beyond the runway that an aircraft can use to continue takeoff if needed.
The diagram visually represents how these distances are allocated and labeled on a runway, providing clarity for pilots and aviation professionals.